Character sculpt project (Unit 7


CHARACTER SCULPT PROJECT


This project was a collaborative unit with Set Design, therefore For the unit, I was working with

 Alexei Wescott in pair.


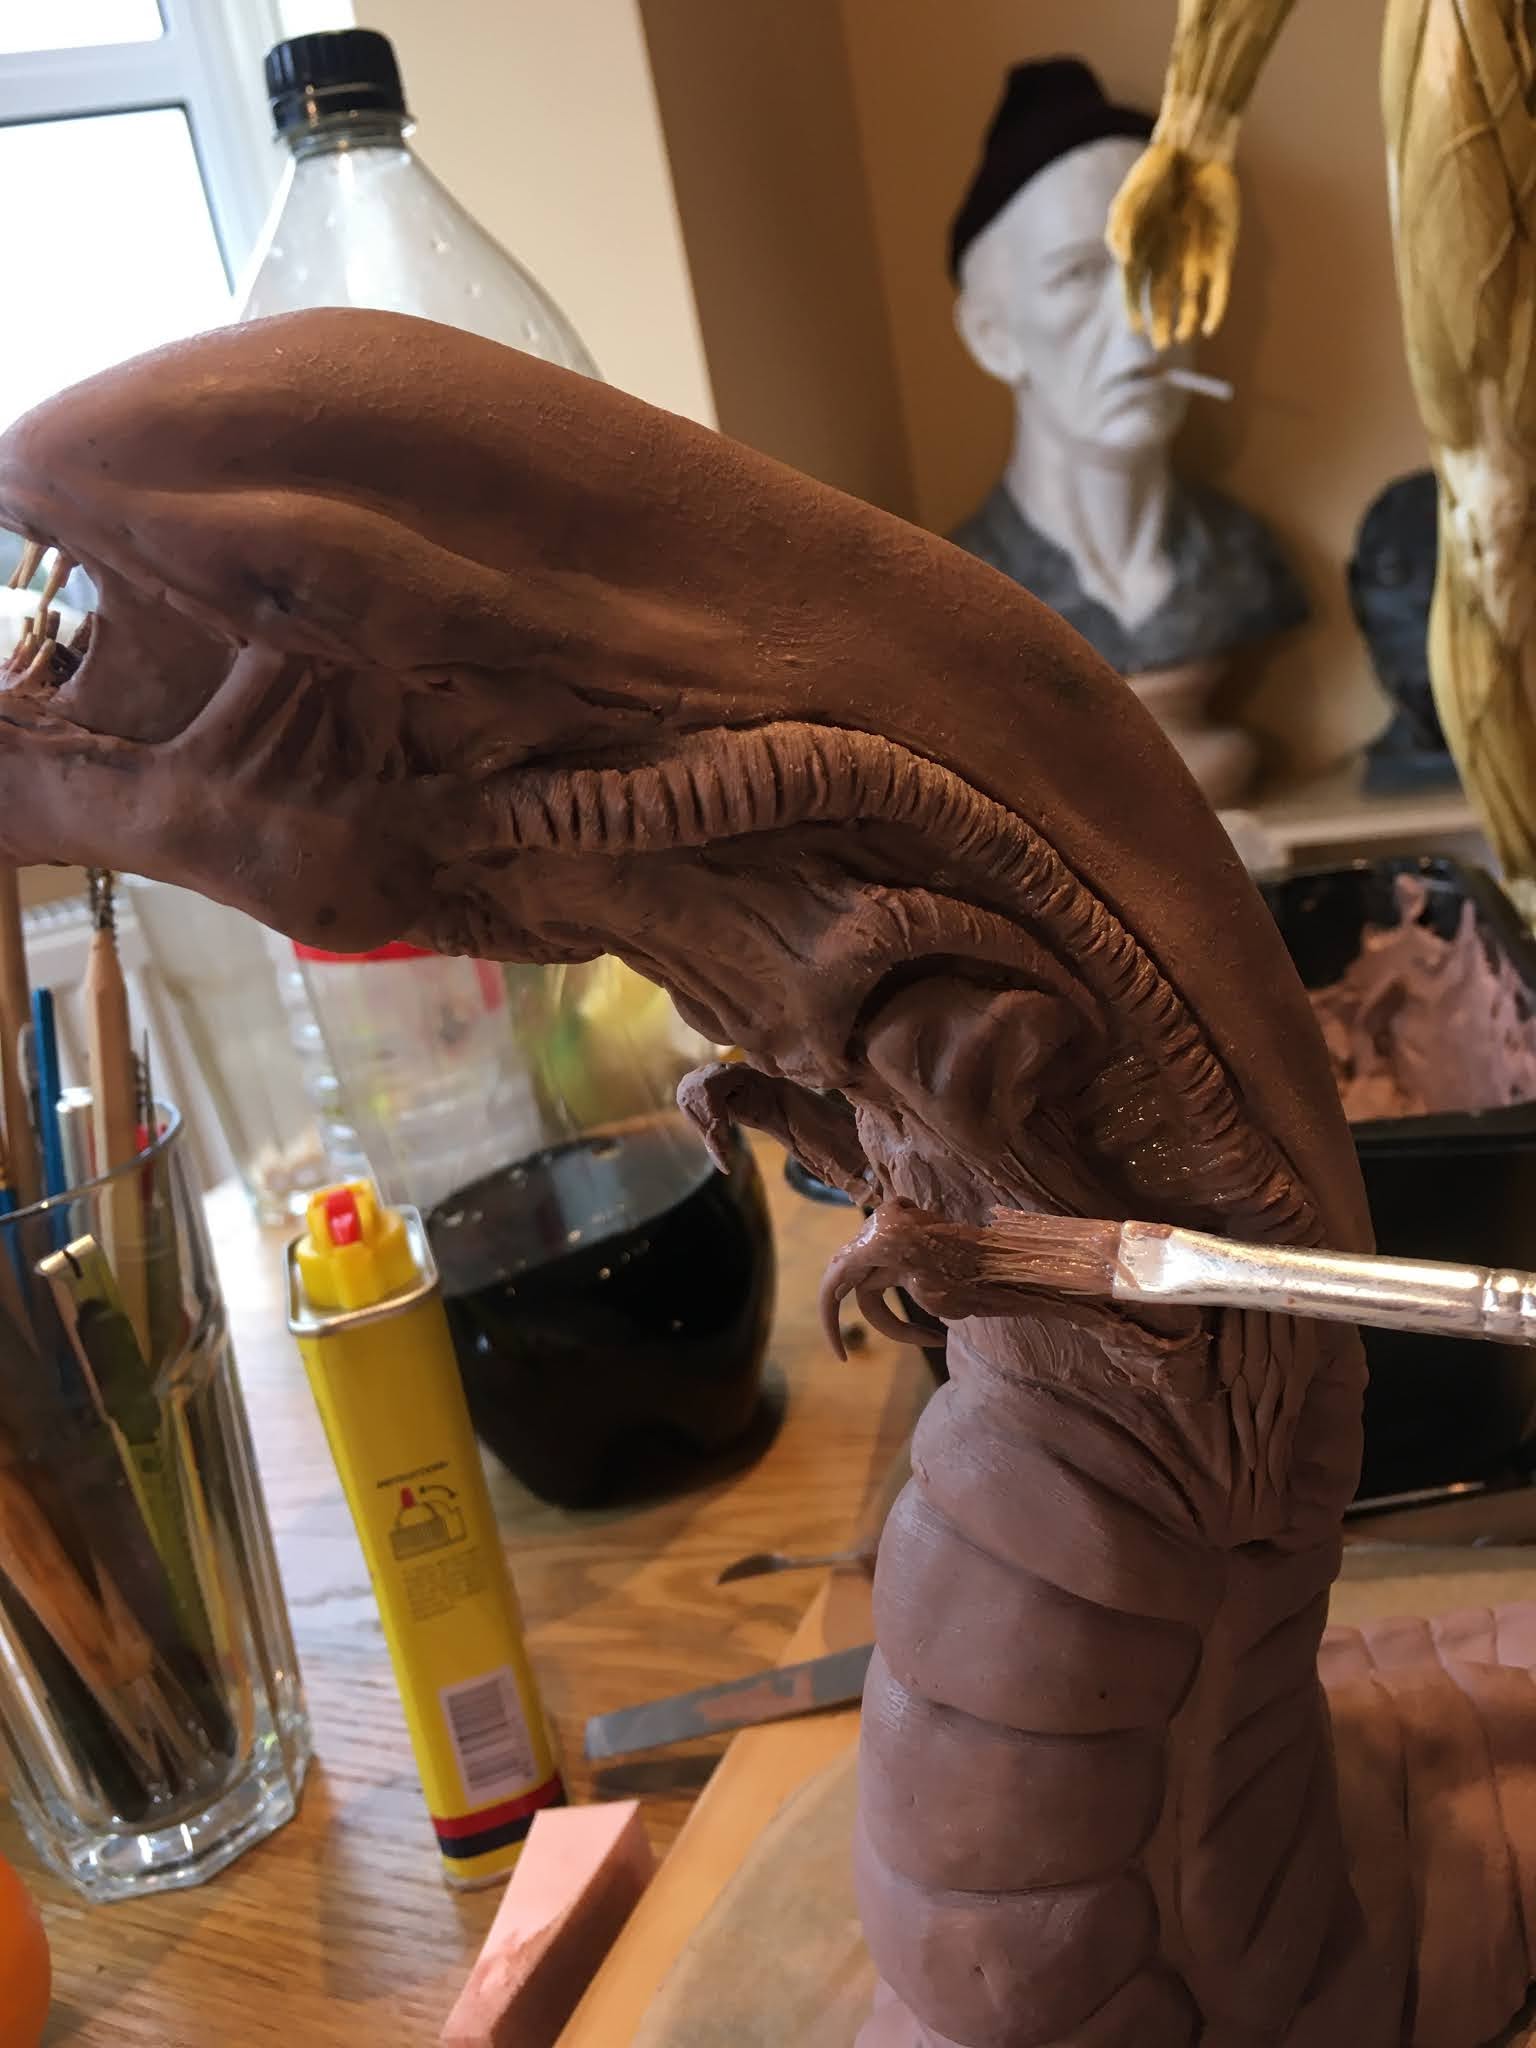
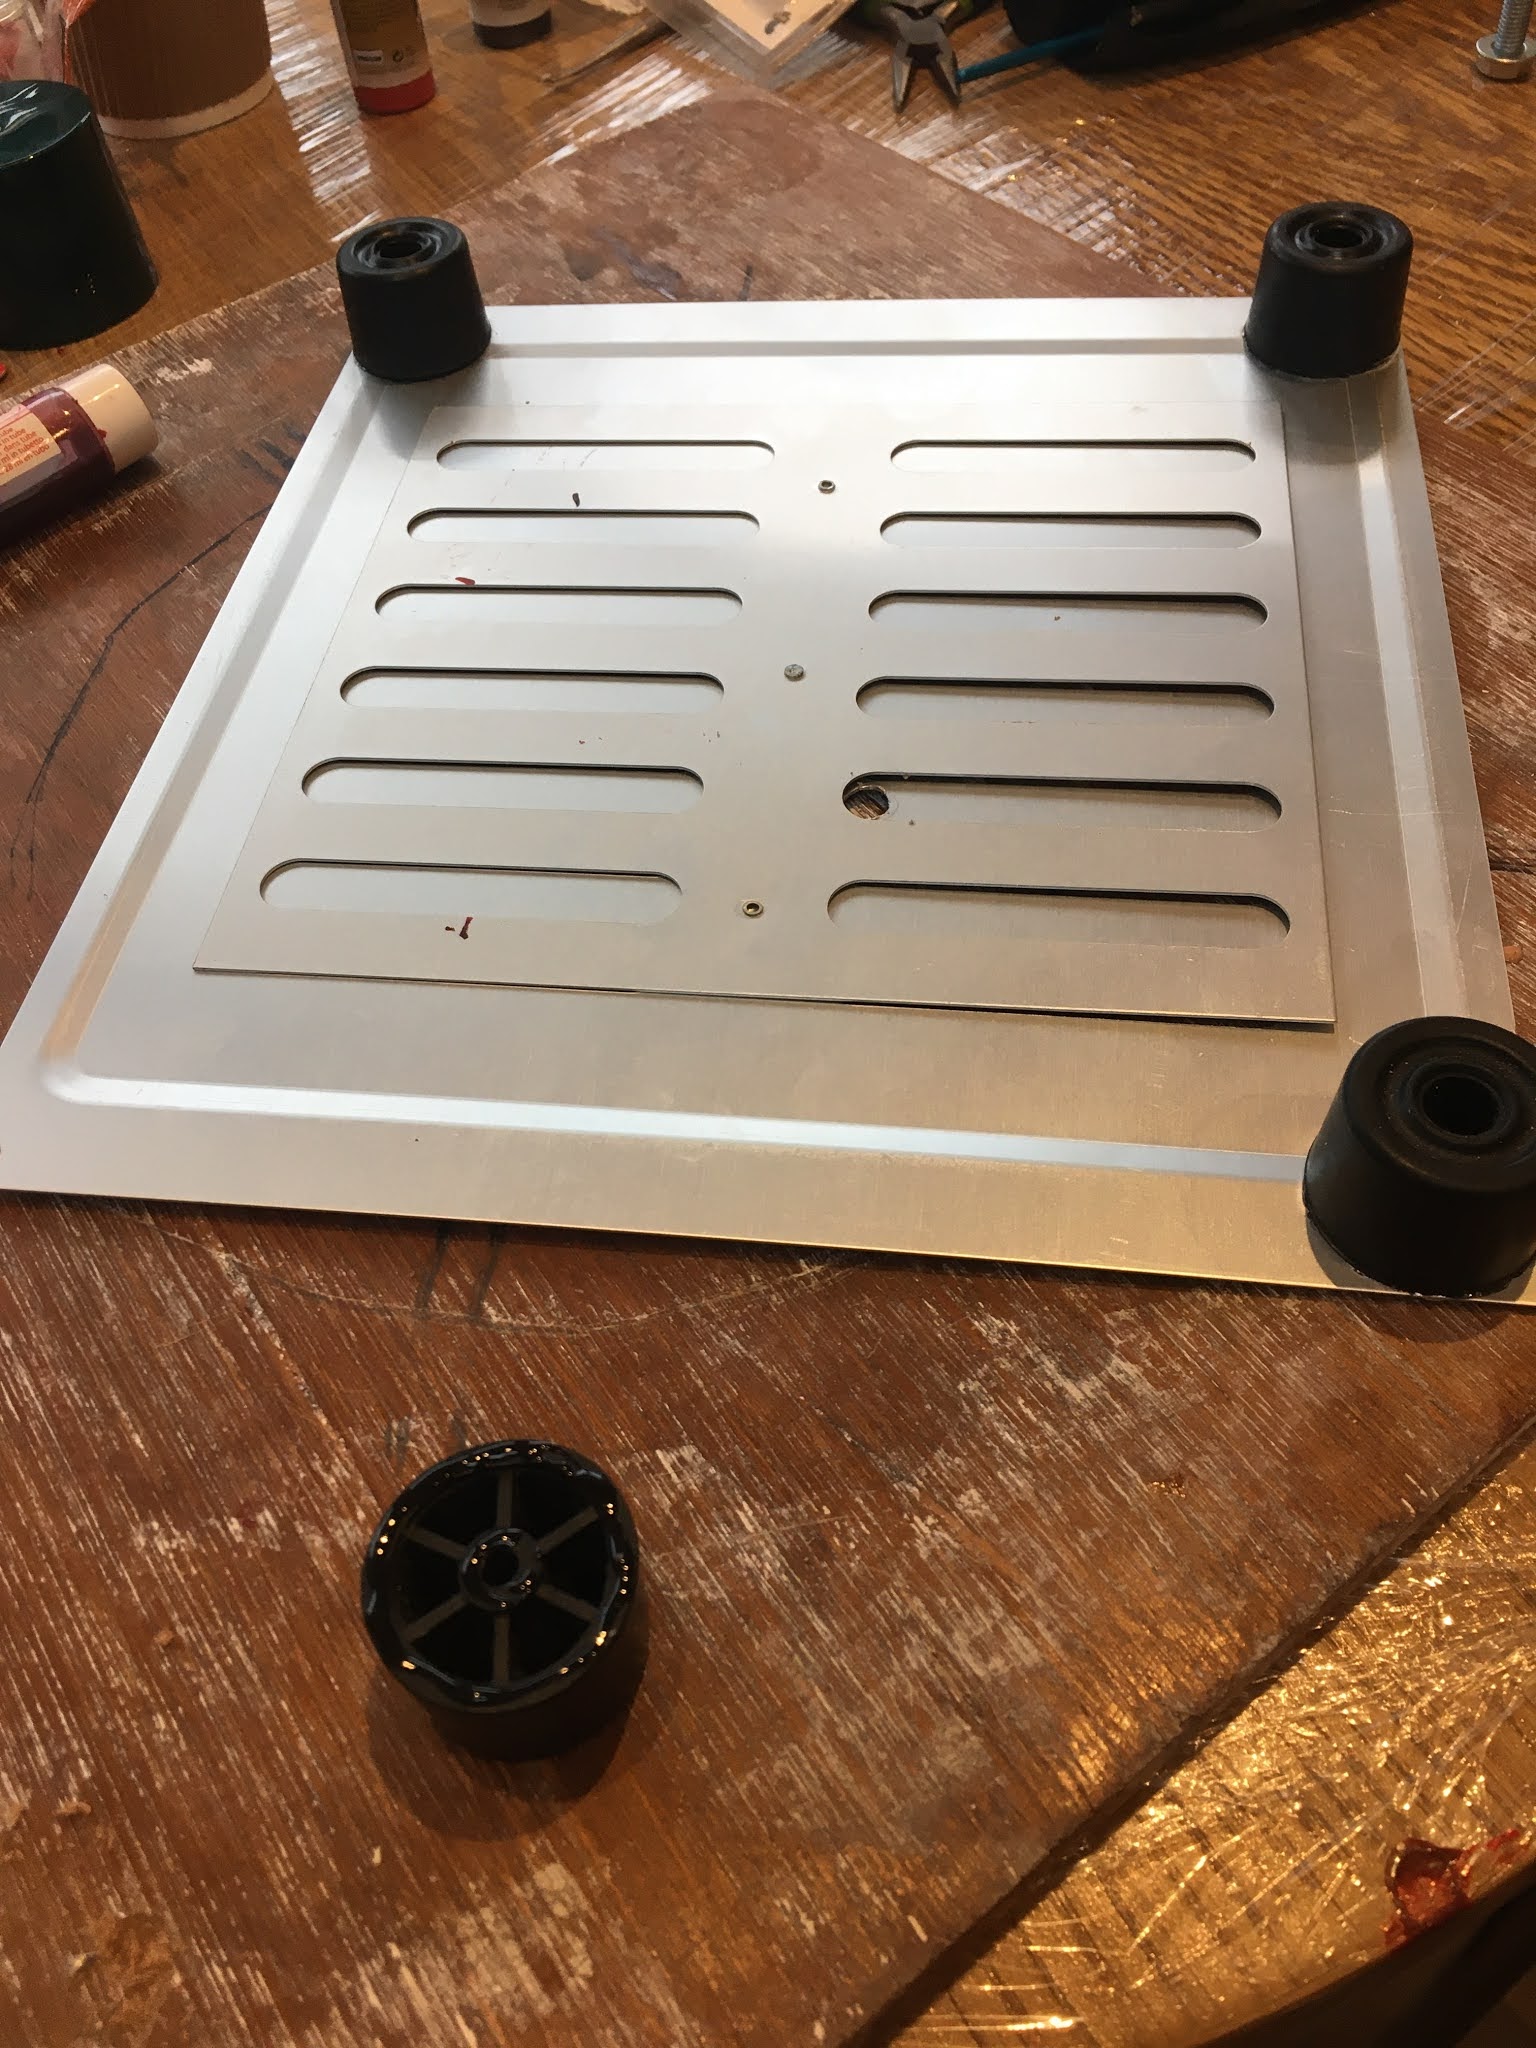
We were given a 5-week project to draw and sculpt a licensed character.  The main focus was to produce a sculpture plan drawing of an existing character from film or TV to a certain scale, then model it as a 3D sculpt but paying close attention to keeping it the correct size and every possible detail. We were instructed that the sculpt should be no larger than 25cm in height and can be sculpted in monster clay, plasticine or similar material.


Why did I choose the Alien Chestburster?


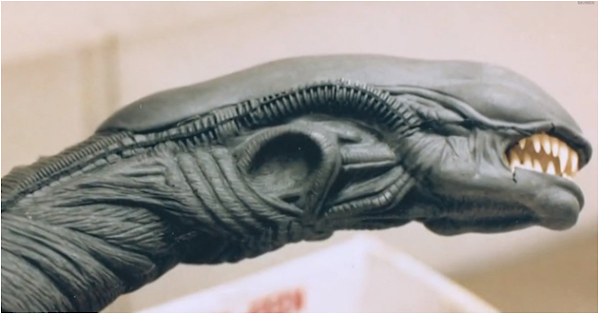
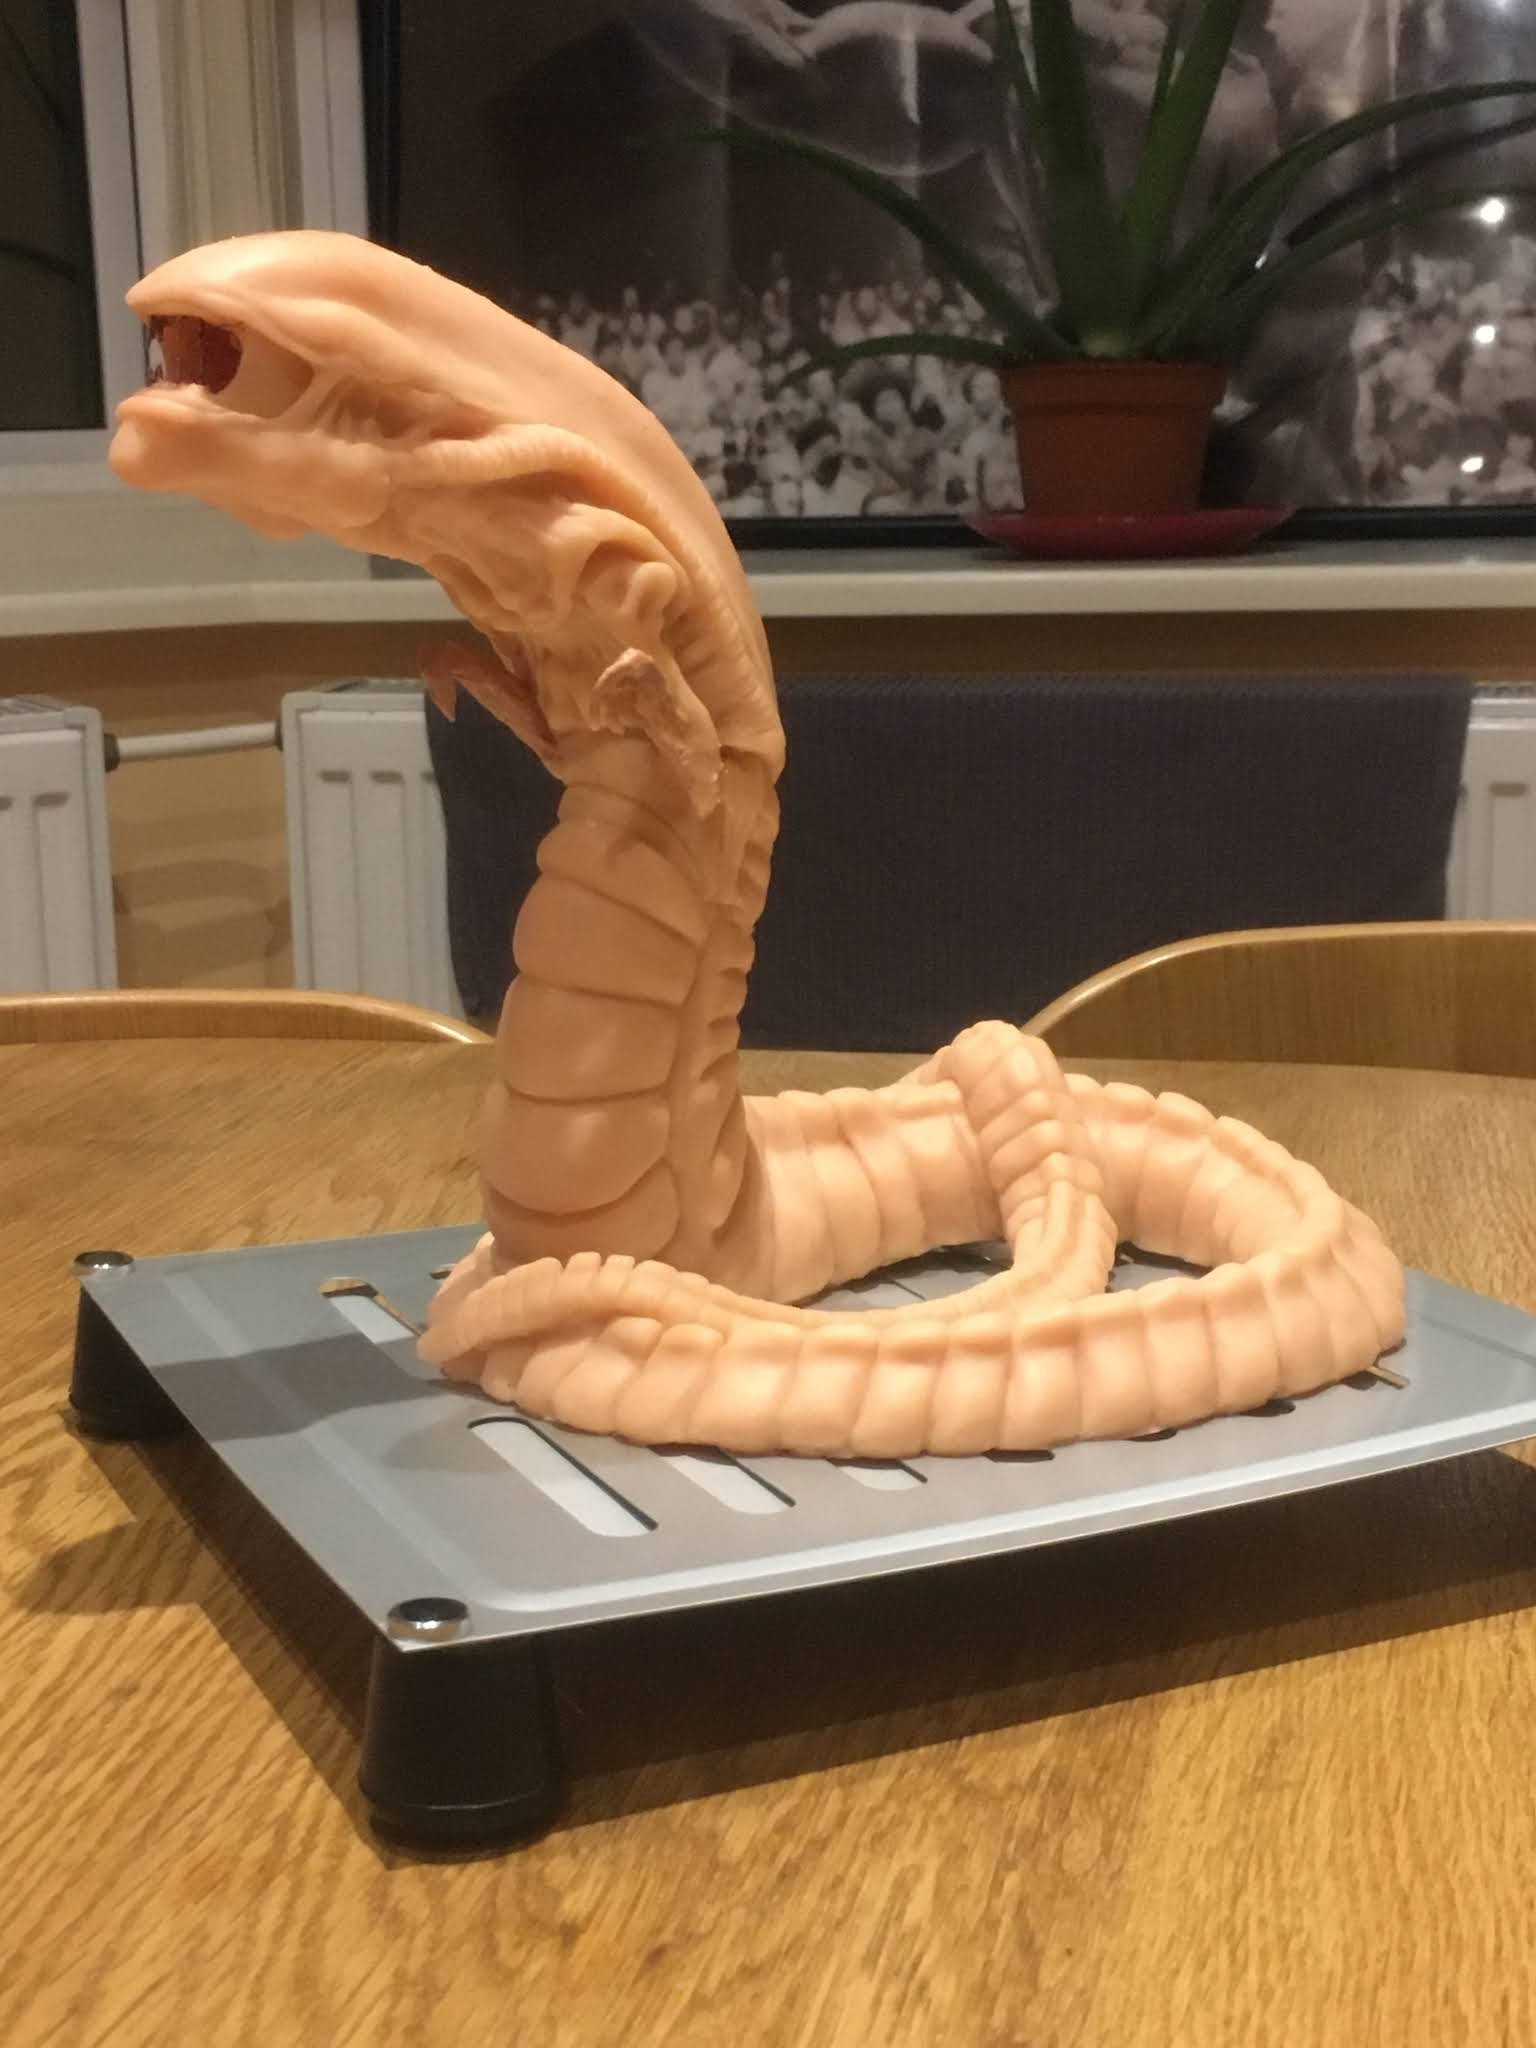
So actually we had the opportunity to sculpt whatever we wanted, but the height can not be larger than 25 cm. I was thinking a lot (since the first year) about what to choose. Around October I started to think, what if I would do a creature, like Yoda, the Alien or Predator. However, I did not want to go for something anatomically difficult if we do not have to much time. And these characters are based on the human anatomy so I was not that sure if I could deliver the quality what I could accept from myself. I had to find the balance and choose something that I can confidently sculpt than I could go through the moulding and casting and finish the sculpture for the deadline. I was on the train to uni, when the alien chestburster came into my mind. I did a quick research about it, and I realised that it can be the perfect choice for me.

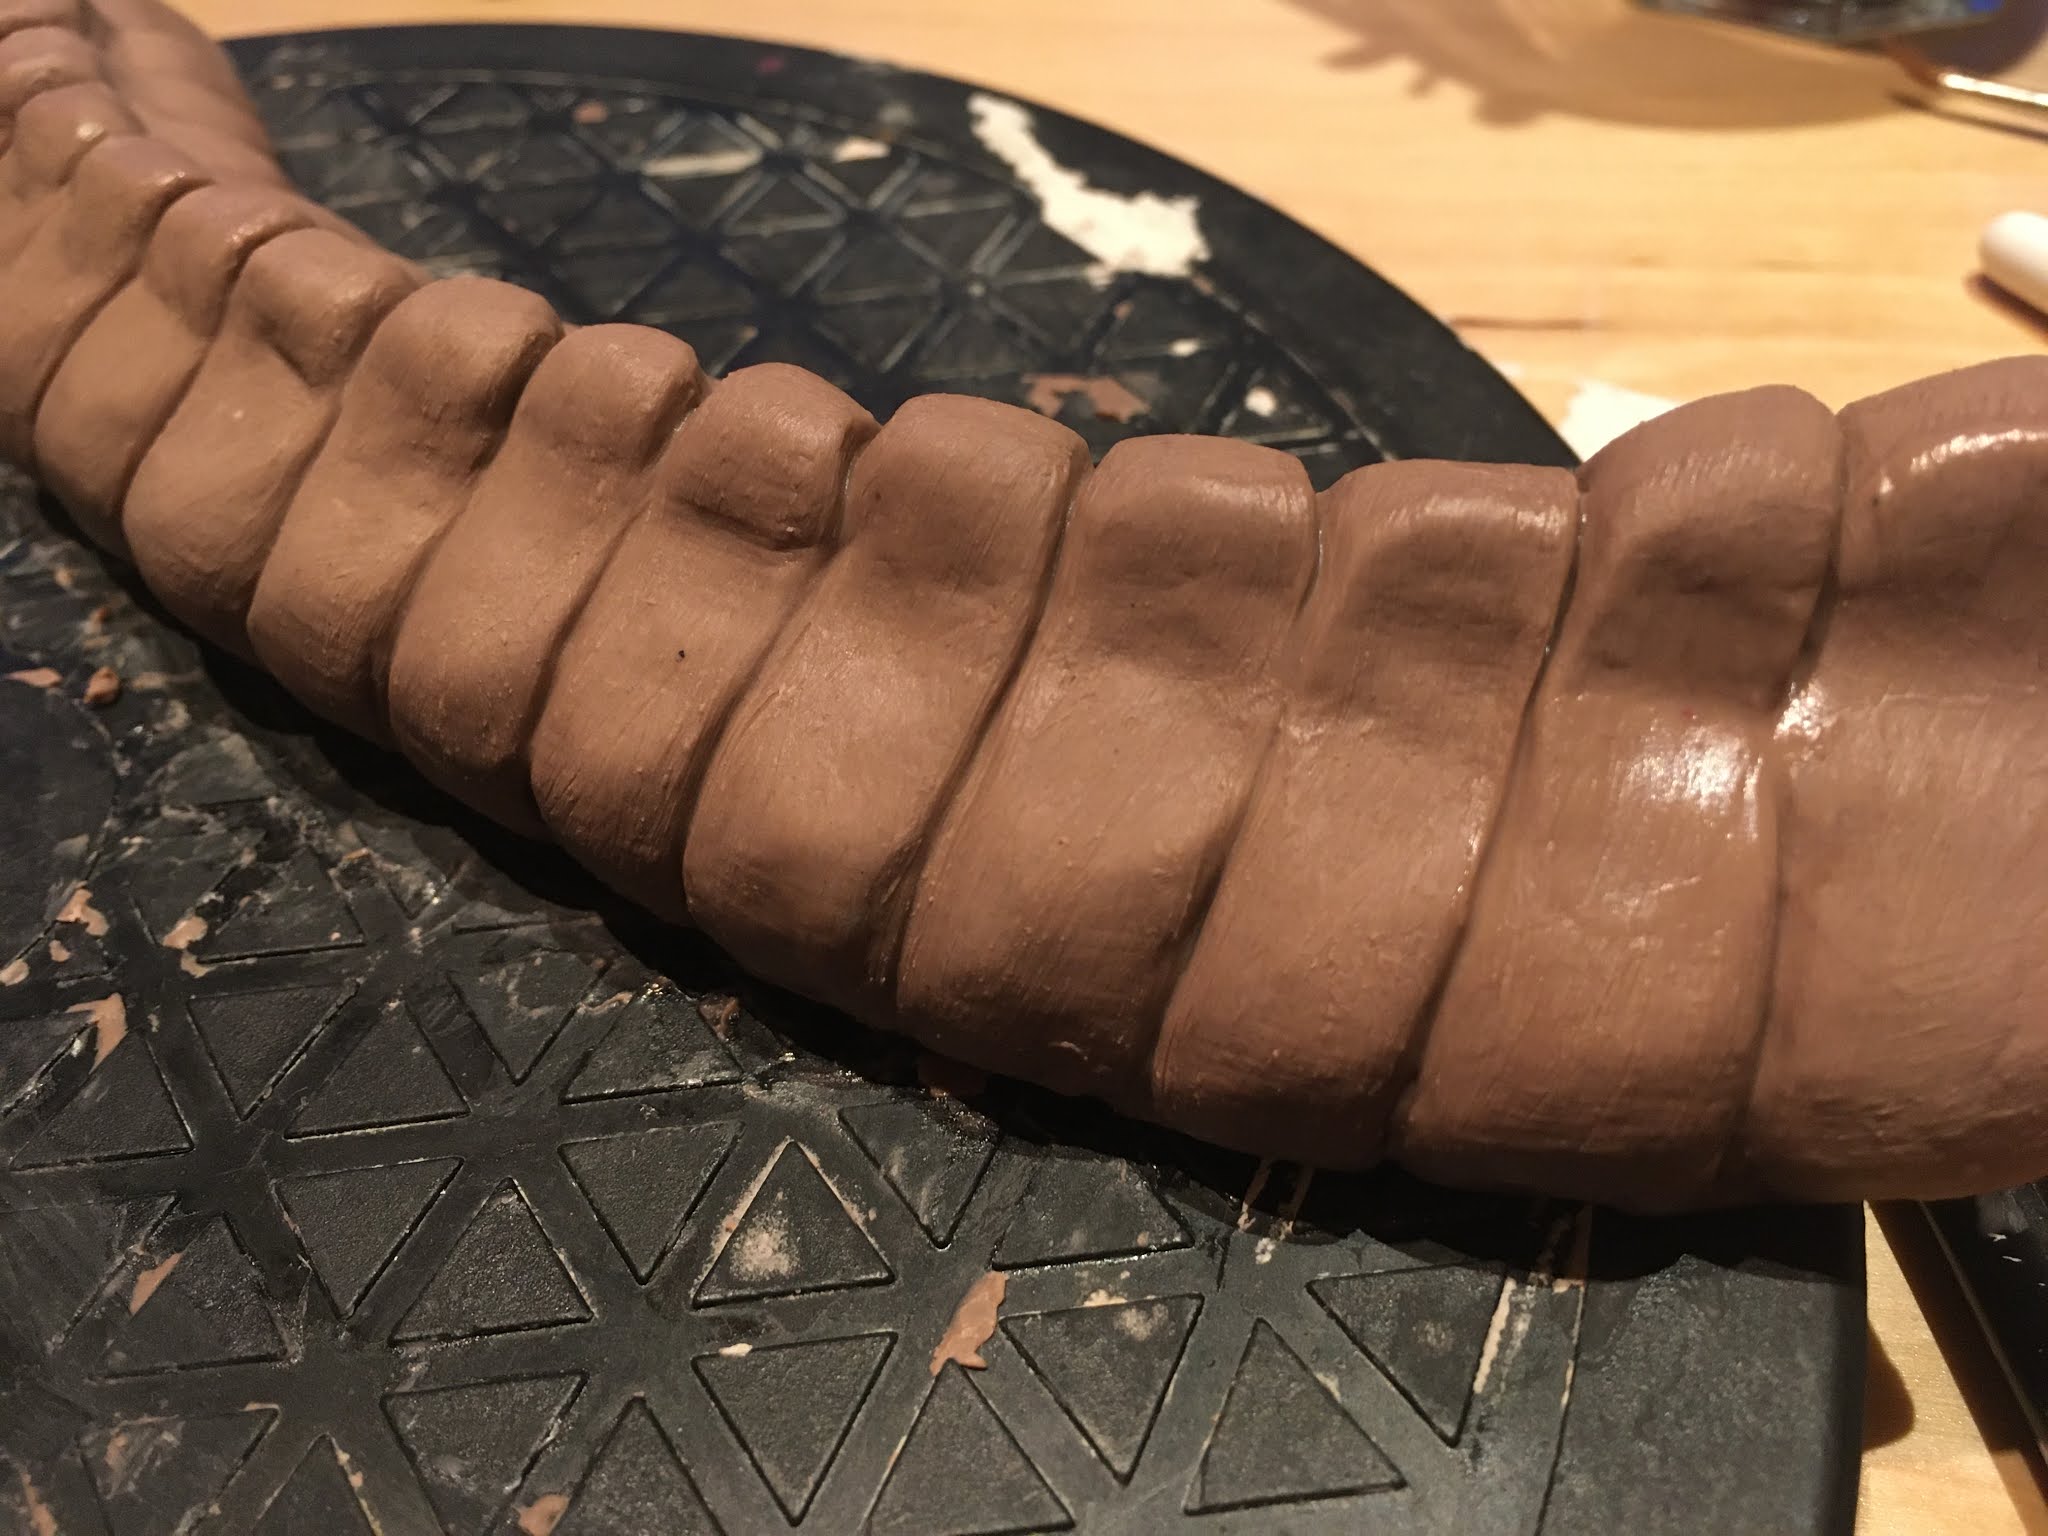
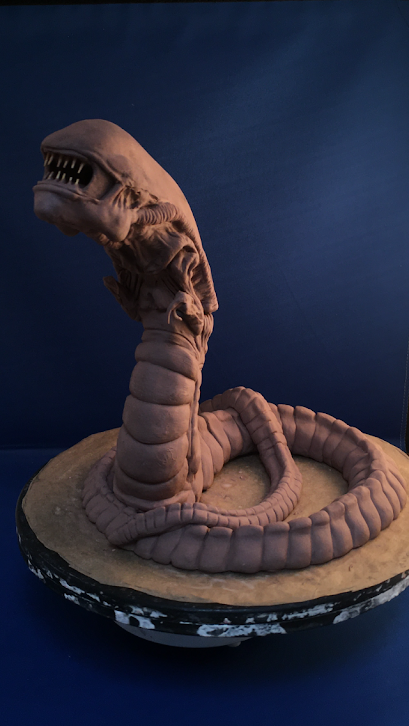
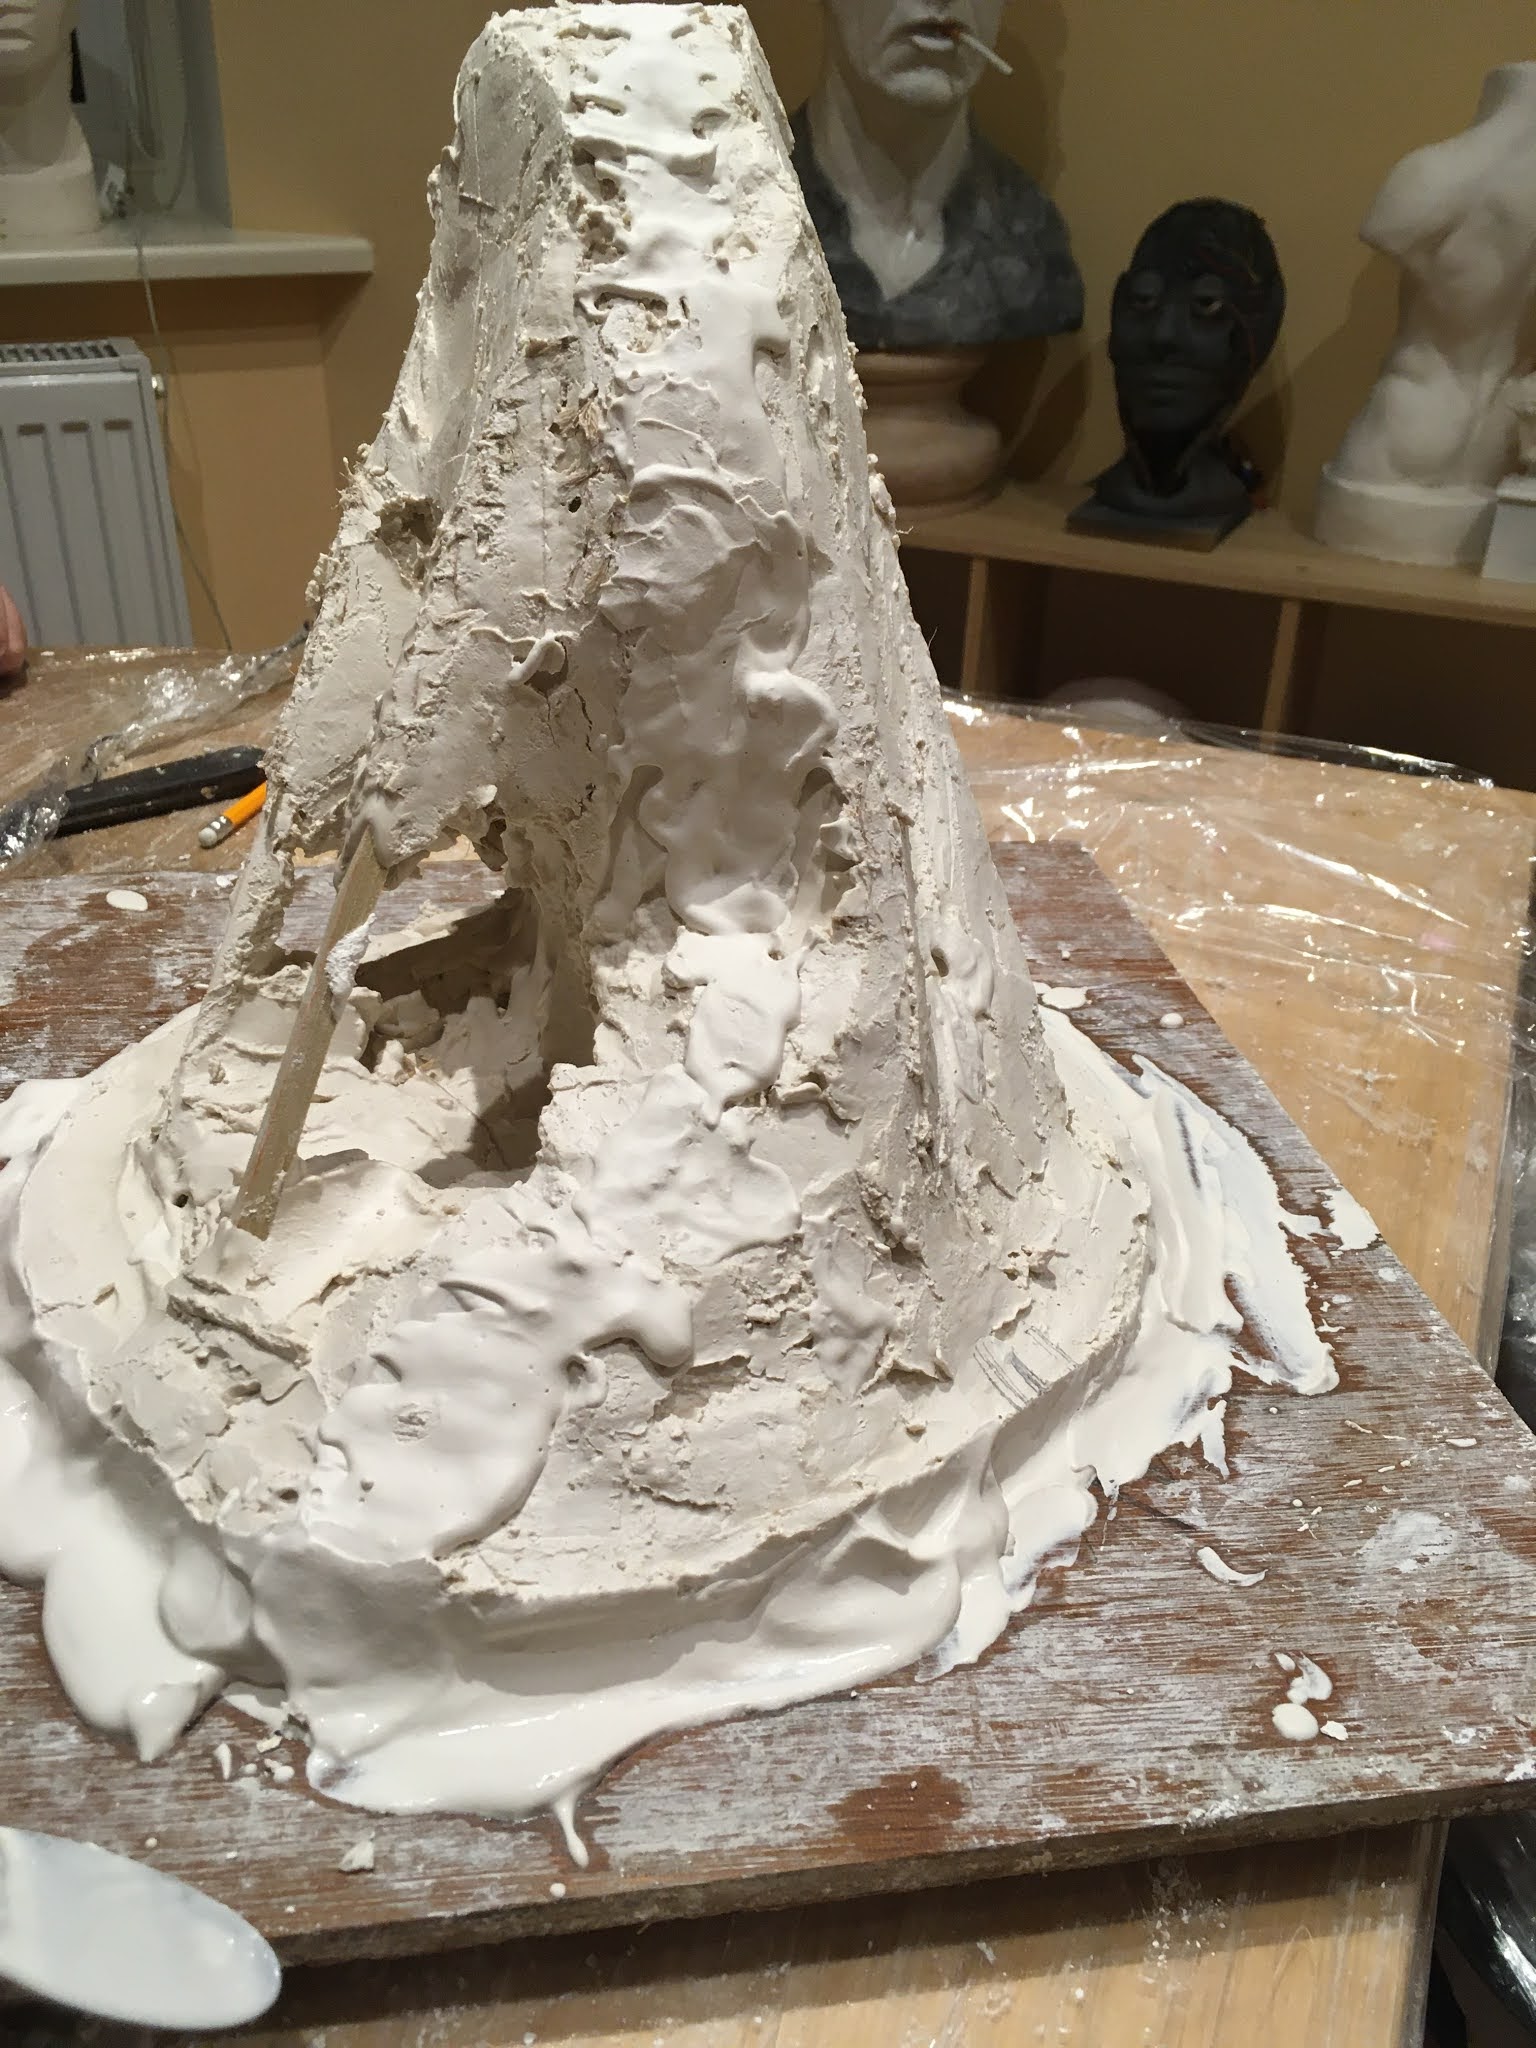
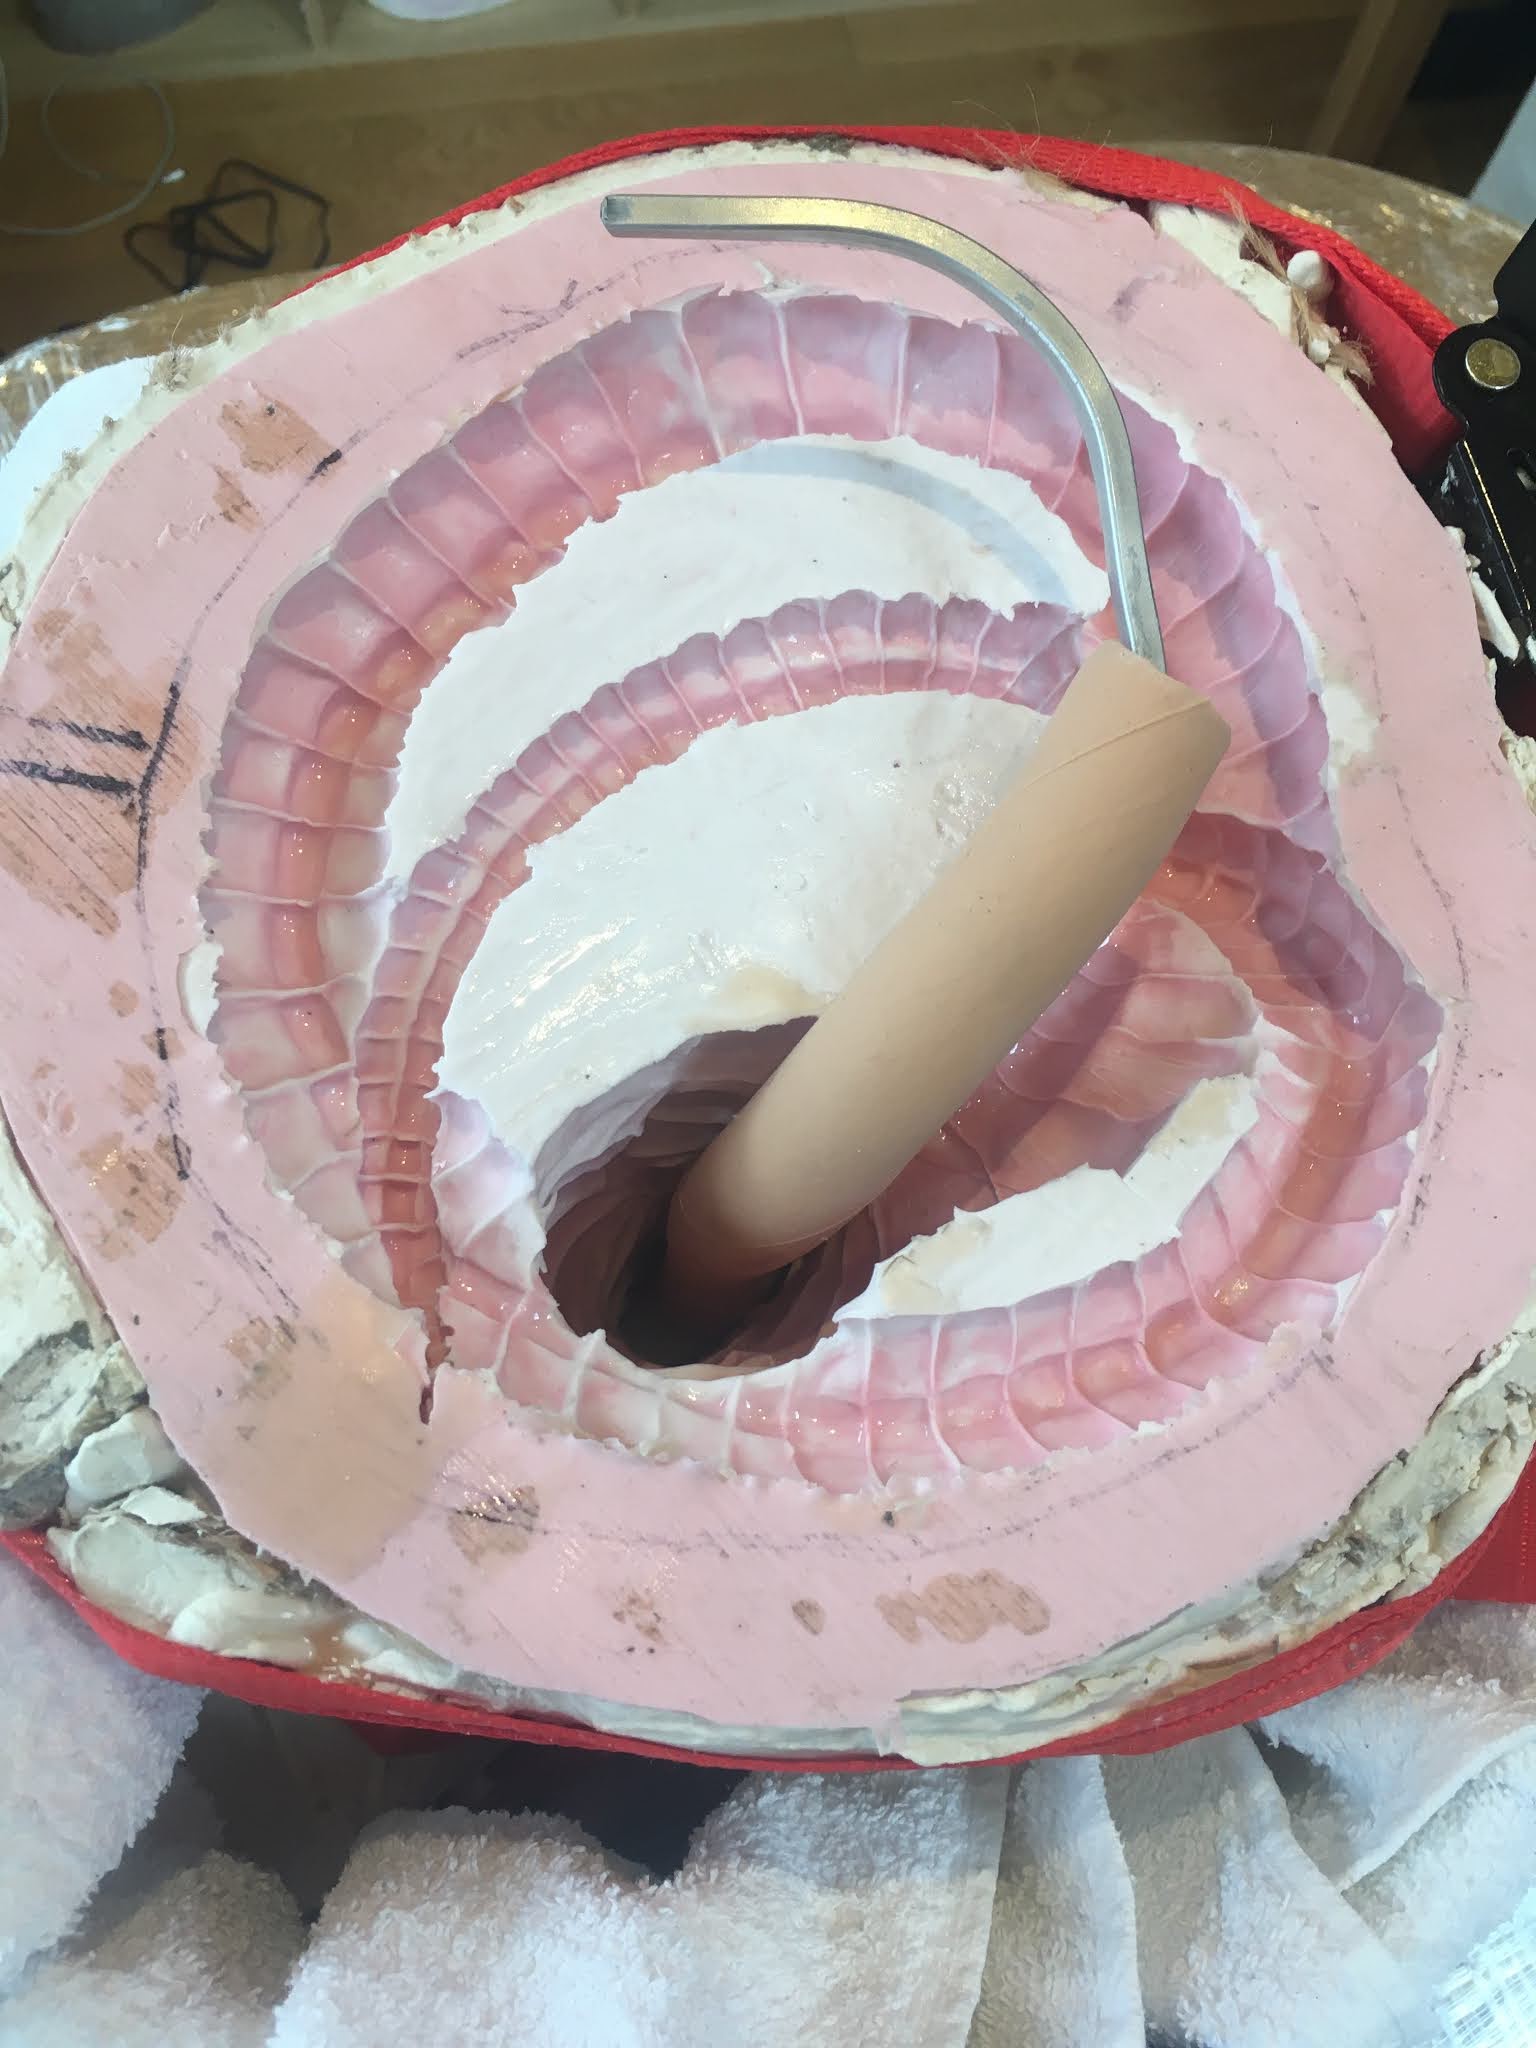
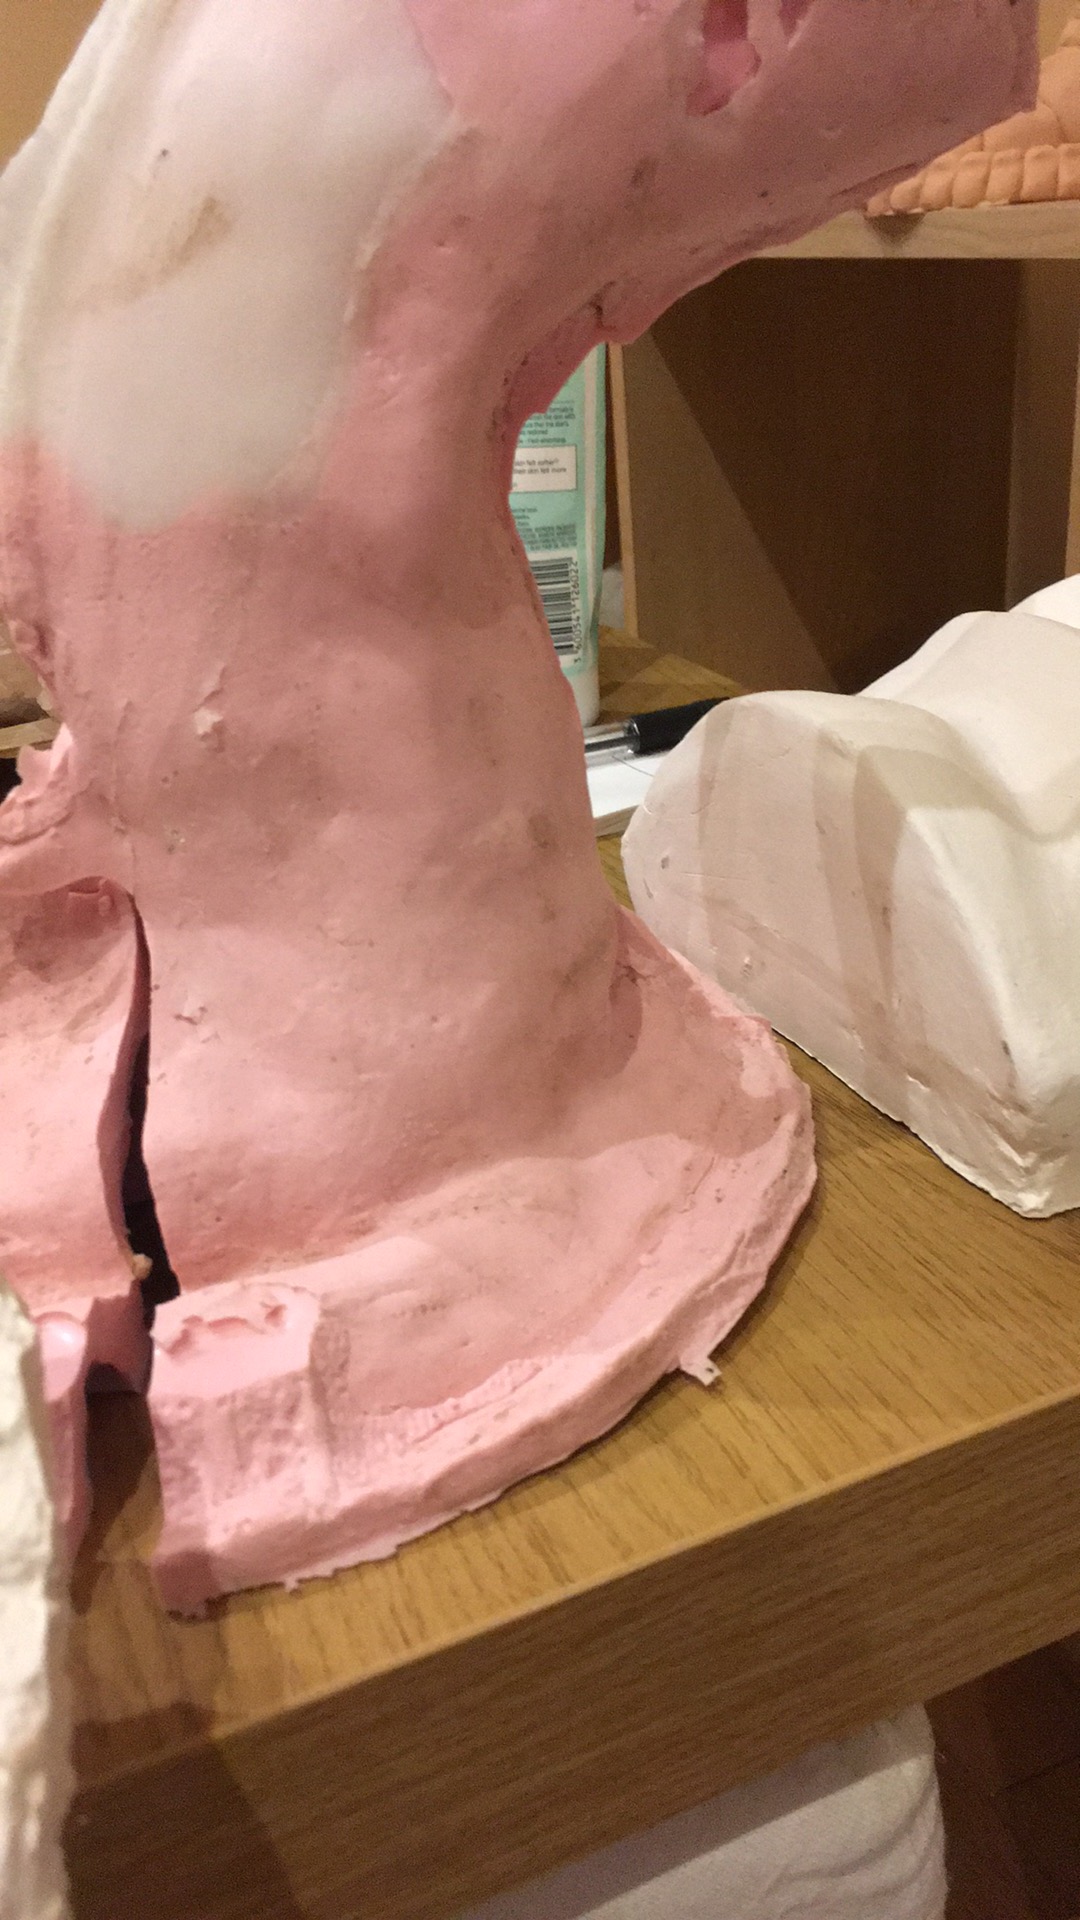
 Then I started to play with the idea, what if...I could make this like a lifesize model? I continued my research about the size of the creature and was thinking about how to make it. Well, I realized tha this creature is like a snake. Ahead, a torso and a long tail, so actually I can roll it up, and place the head and the torso to not reach higher than 25 cm. I found the dimensions of the monster, its 30 cm high, and 81 cm long. I was sure that I can place it to reach the project criteria and keep the original size of it. If I can produce a lifesize of chestburster from the original classic film, then actually I can go a bit further with this project and actually reproduce it as a movie prop for my portfolio! I will cast it in silicone and paint it and make it as realistic as possible! 

All of this plan was only in my head that time, so I was not sure how wide will be the creature if i need to roll it up, so I asked Geraldine how much is the criteria of the width and she said that there is no limit of it. It was the green light for the project to me.
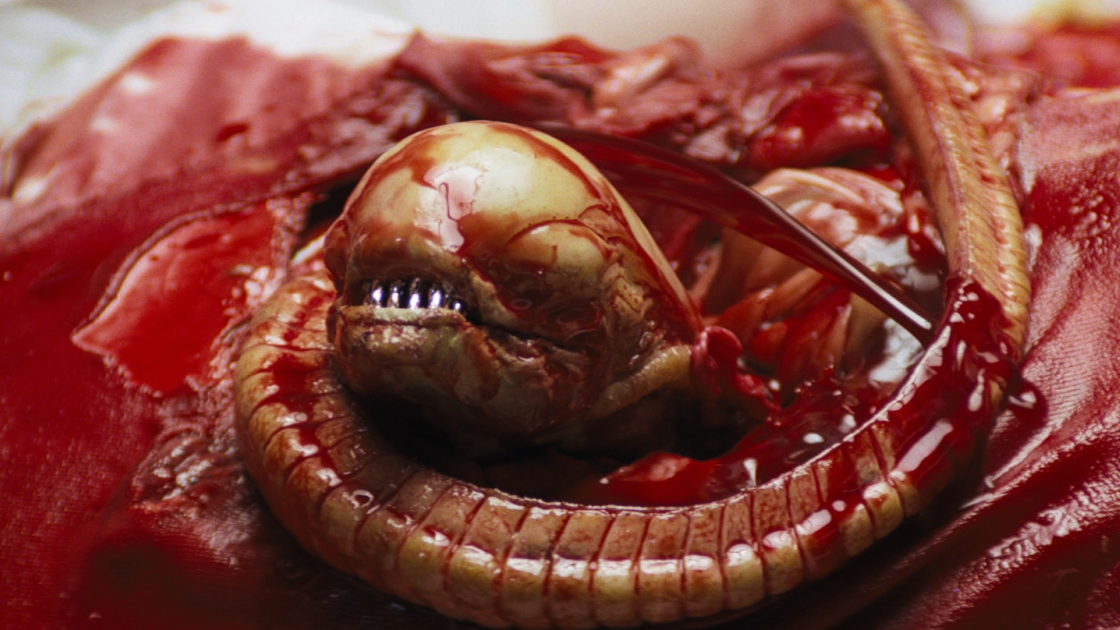

Although I did not find any evidence that the design of the chestburster is based on a snake, however, it's pretty obvious to me. In the film, we do not see it very much and we don't really know much about them, so I think it's good if I follow the anatomy and properties of a sneak when I will placing the monster.


Its like a sneak!


Actually, this is the only scene when we see the full body of it


So I had the plan, and Alexei asked me if I want to pair up with him for this project. He is a talented guy, he made great technical drawings and models last year so I thought its a good idea.

I asked him if he is interested in a project about the original Alien movie. He said yes, moreover some years ago he made a study of the art of HR. Giger's, so I thought it's perfect then.


We started to research. I wanted more and better references for the monster and for Alexei, we were hunting for more design and drawing references for the sets.

During my research, I found more good references from Stan Winstons Chestburster from the second film. Alexei and me we had a chat and I asked him, what if we go for James Camerons Aliens, just because I found more material from that design. Then we were talking about the possibilities if he would build a set of the  LV-426 colony instead of the Nostromo. 

Well, this change would give the opportunity to make more detailed sculpture and more creative freedom for him, because there is much more to explore on a colony than on a spaceship. Maybe we can represent areas, places what we did not see in the film. So thought is more exciting to go for the second film.


Alexei's chose to create a set of the Colony LV 426 and I have chosen to sculpt the Chestburster Alien. First things first I have studied the creature.

Alexei and me we agreed to continue to keep in contact with each other via messenger, moreover, we had a catch up over the phone twice a week and we gave feedback to each other.

From Dan O’Bannon’s ideas, HR. Gigger designed the creature for the first move.

For Aliens, the design of the Chestburster from the first film remained practically unchanged by the special effects team at Stan Winston's studio, apart from adding two tiny arms to create consistency between the infant creature and the anatomy of the fully-grown Warrior. Cameron and Winston decided that the addition of arms also made sense on a purely functional level, allowing the Chestburster to pull itself free from its victim's chest.


RESEARCH

I started my research with two movies. The first film was ‘Memory: The Origin Of Alien’. In this film, I saw lots of background information about the original ideas and the process of production design.


 The other film was the ‘Making of Aliens’, which was a Bonus disc for the special edition DVD release. This disc also included lots of behind the scenes about the special effects. 


I have found some great books at the library. In these books, I found great sources of the original set design and creature design drawings.


References for the sculpture

My main references are the original pictures of the Chestburster sculpture from  stanwinstonschool.com.
I decided to copy this as precisely as possible.


My secondary references are sculpture pictures from other artists. I also used pictures of real snakes, because I want to make this character sculpt to look as real as possible (anatomy).


I really liked this sculpture.


                                                         The Drawings


Before I started to draw, I made a sketch from clay, just to see the shapes in 3 d. 


Turnover drawings and concept art

From the previously represented references, I created my own sculpture design.


Concept design


Sculpting the monster from Monsterclay


After my research I worked with the following measures:

Chestburster Alien 1:1

-81cm long
-30 cm tall (I place the posture, just like a snake to not reach more than 25cm)


I have decided to sculpt the tail first in pieces and later on put them together with my cordless soldering iron. It was easier to sculpt from every angle.


I was constantly playing around with the pieces, put them together to see how it will look like, but I did not want to "glue" them together permanently until I reached a certain quality of them, otherwise, I believe it would be quite difficult to reach and sculpt everything in the same quality. So during sculpting, it was easy to put them together to see how it works, then separate again, and sculpt the parts from my hand. 


I love working with Monsterclay. It was easy to bend the parts then "glue" them together.


I put the armature only in the head/ torso part. I did not need any other armature, the sculpture was strong and stable.


I did not go for any fine details until I had like a good overall shape.  


I made some holes for the teeth. 


I made out the teeth from cocktail sticks, they are temporary teeth only anyway.


I inserted the arms as the last parts of the creature.


I Smoothed the sculpture with some fine brush and lighter liquid as we were teaching for it at the uni during the previous unit.


During our prosthetic project, Geraldine was teaching us how to make several textures. I watched back her demo (what I recorded at the studio) then I started to create some Extraterrestrial like skin.


THE FINISHED MONSTERCLAY SCULPTURE


Exhibitions

Before the lockdown, in December I visited the permanent gallery at the Royal Academy Of Arts.

This sculptures just fills me with ambitions every time when I see them.


On the following weekend, I visited 3 exhibitions at The National Gallery.

In 17th-century Europe, at a time when women artists were not easily accepted, Artemisia was exceptional. She challenged conventions and defied expectations to become a successful artist and one of the greatest storytellers of her time.

Artemisia painted subjects that were traditionally the preserve of male artists and for the male gaze; transforming meek maidservants into courageous conspirators and victims into survivors.

In this first major exhibition of Artemisia’s work in the UK, the Gallery displayed her best-known paintings including two versions of her iconic and viscerally violent ‘Judith beheading Holofernes’; as well as her self portraits, heroines from history and the Bible, and recently discovered personal letters, seen in the UK for the first time.


The next Exhibition was Sin.


This exhibition looks at complex theological ideas and depictions of ‘sinful’ everyday behaviour that blur the boundaries between religious and secular art.

A concept that is universal, but at the same time highly personal, the exhibition asks you to define your own meaning of ‘Sin’.


Wow, a lifelike sculpture at the Gallery!


The third exhibition was Titian.


Titian’s sensuous interpretation of Classical myths of love, temptation, and punishment.


Well mostly I visited it because of the mythologic subjects and I am interested in the classic way to represent human figures.


After the exhibitions, I could not leave without watching the permanent collection......again., and his time I discovered something "new" here.

After our still life drawing week at uni, I see those fantastic still life painting in a different way!


Talks
During our Unit 7 collaboration unit, we had several online talks and workshops. I would like to highlight the presentation and talk from Artem, a special FX for film and TV company based in West London.  I heard of this company previously so keen to know more about it.   It was exciting to see some of their work.  Artem is definitely on my list to work for.  


Moulding and Casting step by step

The Plan for the Mould


Before I started moulding I planned out everything. 

-apply the first thin silicon layer with a fine brush to make sure the rubber will cover the entire sculpture, pick up all the details without any air bubbles. (this is the most important step for me)

-then apply more silicone layers (with a bit more catalyst) 

-After that wrapped in cling film

-cover it with clay 

-apply a 2 sided plaster coat as the shell of the mould.

-when the plaster sets, open the mould and remove the clay

-pour more silicone into the mould (replace the clay layer to silicone)

I wanted to make sure that the rubber negative is strong and it will have the same thickness everywhere.

Before I started, I made some drawing, due to I am a very visual person.


Let's mould it!


I have used a basic T20 mould rubber for the silicon negative.


The first layer of silicone


After the third layer of silicone


The clingfilm layer


The clay layer


The plaster jacket


After that, I opened the mould and removed the clay.


Then I closed the mould again and poured more silicone in it.


I had to mould the arms separately


Casting

The resin master cast

After I had the negative of the sculpture, first things first, I cast the master from resin.


It came out nicely from the mould, and I sand it straight after demoulding.


Casting in Silicone

Well, This was a quiet interesting part of my project. From the beginning, I wanted to make the sculpture as a movie prop and make it as realistic as possible. So it was very important what material I choose to cast in. 

My first thought was the PlatGel 10, what we used at uni for the prosthetic. 

But is this good for this project? Is this good for props or only for prosthetics? Do I need deadener for this?
I did some research but I became more confused a bit. Which material would be the best for an alien? Which silicone would give the illusion of an alien skin? 
Well.....who would know any better than John Humphreys? I am very lucky because I had a chance to meet him at our university, so I phoned him. He was very helpful like always when I approach him for advice, but since he was involved with special effects, the materials have changed and he directed me to his friend who still works in the SFX industry.
So I contacted him, and the answer was the same PlatGel10 +  without deadener.

The other challenge was the armature. How will I place the wire into the mould without the wire sticks out from the positive cast? After a lot of thinking, the answer came in my dream when I was sleeping.

Put the wire into a paper tube fill it with the casting silicone. So when I will put it in the negative, then i will pour the rest of the silicone, and it will just stick together with its own material!


Actually, I made a silicone coat for the wire


As the next important step, I sprayed the release agent into the rubber negative.

Prepare the rubber

I have mixed the Silicone A with the pigment than I put it in the vacuum than I did the same separately with the silicone B.

After that I mixed part A and B then I put the rubber in the vacuum again.


I expected that I may have problems with the cast. Air bubbles or missing parts, therefore I separated some silicone for later if  I need to fix something later on.

I poured the material from a high distance to avoid the air bubbles, as Geraldine and Martin showed us at the studio.


Open the mould: 
The birth of the Alien


For some reasons, I could not avoid all of the airbubbles.


I turned the cast upside down, and I started to fill the holes with silicone.


The Silicone casts

Making Teeth 

The alien has chrome teeth in the film, John's friend advised me to use a comb for the teeth. 


Painted with blood

I wanted to play around a bit, and paint the monster to looks like in the film. Covered with blood.


Well, was not very happy with the outcome. I never painted before, I need to learn this. Until that, I just washed it off.


Making a pedestal

The last step is representing the sculpture, so I decided to build a pedestal for it which looks like a spaceship, or space station floor. I had to make sure that this will match with Alexey set designs.


After that, I had to build another pedestal for the second cast :)


concept idea from Lex's set and my character sculpt


Conclusion


What I would differently?

Although I sorted out the colour of the monster by adding a pigment into the casting rubber, I could not paint the monster in the way as the professional industry standard would require. There is no excuse, I need to learn how to paint if I want to make lifelike things in the future. I need to find someone at the uni who can teach me this.

I really enjoyed this project, but it was quite challenging. I had some scary moments, for example when I was not sure if my silicone cast will stick into the silicone negative. However I learnt a lot from this unit, and I gained experience with monster clay and silicones. Working with Alexei was smooth and easy. We reacted to things very quickly. People are reacting quite positive when I show them my outcome. Maybe because they recognise the creature? I decided to make other creatures from the Alien movies, maybe over the summer or in the third year. 


Comments

Popular posts from this blog

Unit 9 - Where In The World? Part II. Digital Character design and environment

Monsters Among Us - Documentary

How do special effect techniques construct the identity of a character? (Unit 1)